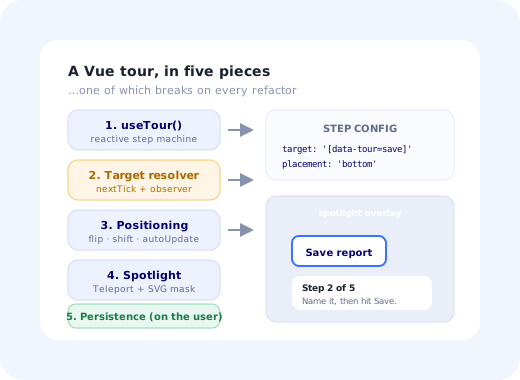
A product tour in Vue starts out looking like a component problem. You have a reactive step
index, a <Teleport> to push the tooltip to the body, and a computed style that
positions it. Thirty minutes in, it works on the page you built it on.
It is the second page that teaches you what a tour actually is. The target lives inside a
<Suspense> boundary that has not resolved. The router swaps the view mid-step and
your onMounted measurement is now describing an element that no longer exists. A
v-if collapses the sidebar and the tooltip is pinned to coordinates in empty space.
And the person who wants step three reworded is not a developer.
This guide covers building a Vue product tour properly: the reactive step machine, resolving targets that arrive late, positioning with the Floating UI primitives, a spotlight overlay drawn with an SVG mask, and persistence that survives the router. Then it covers the parts that stay hard in Vue specifically, and how to decide whether this belongs in your codebase at all.
Key Takeaways
- Model the tour as a composable, not a component.
useTour()holding reactive state can be driven from anywhere; a component locks the tour to one place in the tree. - Never measure in
onMountedalone. Vue's reactivity is asynchronous; you neednextTick, and usually aMutationObserveron top of it. - Use
<Teleport to="body">for the tooltip and overlay, or a parent'soverflow: hiddenand stacking context will clip your tour. - Watch the router, not just the DOM. A route change should pause the tour and re-resolve, never silently continue against a stale element.
- Recompute on scroll, resize and mutation. A fixed tooltip that does not follow its target is the most reported tour bug.
- The build is two days; the maintenance is forever. If rewording a step needs a release, the cost model is the problem, not the code.
What You Are Actually Building
A product tour looks like one feature and is really five, each with its own failure mode. Most estimates cover the first two. The table below is the honest surface area; it is worth reading before you commit a sprint to it.
| Piece | What it does in Vue | Where it breaks |
|---|---|---|
| Step machine | A reactive or ref holding the current index, status and step list. |
Lives in code: every copy edit is a pull request and a deploy. |
| Target resolver | Finds the DOM node for a step, waits for it if the component has not rendered. | Suspense, async components, v-if, virtual scrollers. |
| Positioning | Places the tooltip beside the target, flips when the viewport runs out. | Transforms, scroll containers, RTL, long translations. |
| Spotlight overlay | Dims the page and cuts a hole around the target. | Stacking contexts, position: sticky headers, scroll drift. |
| Persistence | Remembers who has seen what, across routes and sessions. | localStorage is per-device, so the tour reappears on the second machine. |
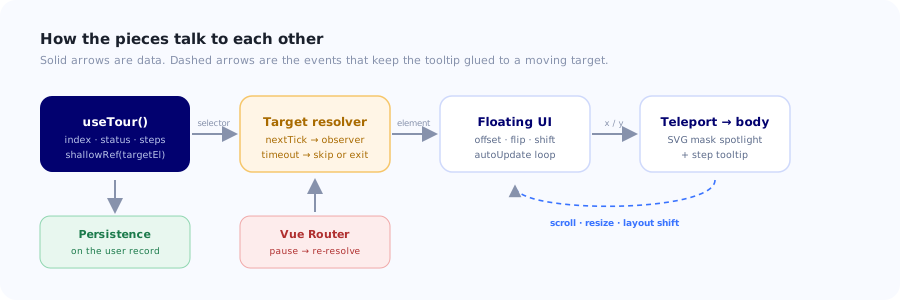
The five pieces of a Vue product tour, and the direction the data flows between them.
1. The Step Machine as a Composable
The instinct is to write <ProductTour :steps="steps" /> and mount it in
App.vue. That works until something outside the component needs to start, stop or skip
the tour: a button in a settings page, a route guard, an analytics callback. Then you are passing
refs through provide/inject or reaching for a store.
Model the state as a composable instead. The component becomes a thin renderer over it, and anything in the app can drive the tour by importing one function.
import { ref, computed, shallowRef, readonly } from 'vue'

const steps      = shallowRef([])
const index      = ref(-1)
const targetEl   = shallowRef(null)
const status     = ref('idle')   // idle | running | paused | done

export function useTour() {
  const current  = computed(() => steps.value[index.value] ?? null)
  const isFirst  = computed(() => index.value === 0)
  const isLast   = computed(() => index.value === steps.value.length - 1)

  async function start(list) {
    steps.value  = list
    index.value  = 0
    status.value = 'running'
    await resolveCurrent()
  }

  async function next() {
    if (isLast.value) return finish('completed')
    index.value++
    await resolveCurrent()
  }

  function finish(reason) {
    status.value = 'done'
    targetEl.value = null
    emit('tour_' + reason, { step: index.value })
  }

  return {
    steps: readonly(steps), index: readonly(index),
    current, isFirst, isLast, status: readonly(status),
    targetEl: readonly(targetEl),
    start, next, finish,
  }
}
Two details matter here. shallowRef rather than ref for the DOM node: you
want Vue to track the reference, not to walk a live DOM element making every property reactive;
that is a real performance trap and a source of very confusing bugs. And readonly on the
exported state, so a component cannot quietly reach in and set index.value without going
through the transition logic that emits events.
Emit an event on every transition from day one. tour_started,
step_viewed, step_completed, tour_dismissed,
tour_completed. Without them you can report a completion rate and nothing else, and a
completion rate is the one tour metric that tells you almost nothing: people finish tours by
clicking Next until they stop. Per-step drop-off is where the information is. See
building a product event taxonomy
for how to name these so they still make sense in a year.
2. Resolving Targets That Are Not There Yet
This is where most home-built Vue tours actually fail, and the failure is quiet. Your step says
'#invoice-table'. The component that renders it is waiting on a fetch.
document.querySelector returns null, the step renders with no anchor, and
the tooltip lands in the top-left corner of the screen, or, worse, the tour stalls with an overlay
up and no way out.
nextTick is necessary but not sufficient. It waits for Vue's current render flush, not
for your API call. You need to wait for the element to appear in the document, with a deadline.
export function waitForElement(selector, { timeout = 5000 } = {}) {
  return new Promise((resolve) => {
    const found = document.querySelector(selector)
    if (found) return resolve(found)

    const observer = new MutationObserver(() => {
      const el = document.querySelector(selector)
      if (el) { cleanup(); resolve(el) }
    })

    const timer = setTimeout(() => { cleanup(); resolve(null) }, timeout)

    function cleanup() {
      observer.disconnect()
      clearTimeout(timer)
    }

    observer.observe(document.body, { childList: true, subtree: true })
  })
}
Note that it resolves with null rather than rejecting. A missing target is an expected
condition, not an exception, and the calling code needs to make a product decision about it:
async function resolveCurrent() {
  const step = current.value
  if (!step) return

  await nextTick()
  const el = await waitForElement(step.target, { timeout: step.timeout ?? 5000 })

  if (!el) {
    emit('step_target_missing', { step: step.id, selector: step.target })
    if (step.optional) return next()      // skip it and carry on
    return finish('aborted')              // never leave the user behind an overlay
  }

  targetEl.value = el
  el.scrollIntoView({ block: 'center', behavior: 'smooth' })
  emit('step_viewed', { step: step.id })
}
The rule that saves you: a tour must always be escapable. If a target cannot be found, end the tour and remove the overlay. A user trapped behind a dimmed screen because step four points at a renamed class is a support ticket, a bad review, and a worse first impression than shipping no tour at all. This is a big part of why onboarding goes wrong.
3. Positioning the Step Tooltip
You can write positioning yourself: read getBoundingClientRect(), add the placement
offset, clamp to the viewport, flip when there is no room. It is about eighty lines and it is
correct until the target sits inside a scroll container, or a parent has a
transform (which changes what position: fixed is relative to), or someone
turns on RTL.
Use Floating UI. It is framework-agnostic, tiny, and it is the library Vue's own tooltip ecosystem settled on. The whole positioning layer becomes this:
import { computePosition, autoUpdate, offset, flip, shift, arrow } from '@floating-ui/dom'

const floating = ref(null)
const arrowEl  = ref(null)
let stopAutoUpdate = null

watch(() => [targetEl.value, current.value], async ([el]) => {
  stopAutoUpdate?.()
  if (!el || !floating.value) return

  // autoUpdate re-runs on scroll, resize, and layout shifts of any ancestor
  stopAutoUpdate = autoUpdate(el, floating.value, async () => {
    const { x, y, placement, middlewareData } = await computePosition(el, floating.value, {
      placement: current.value.placement ?? 'bottom',
      middleware: [
        offset(12),
        flip({ padding: 8 }),
        shift({ padding: 8 }),
        arrow({ element: arrowEl.value }),
      ],
    })
    Object.assign(floating.value.style, { left: `${x}px`, top: `${y}px` })
    // ...place the arrow from middlewareData.arrow
  })
}, { immediate: true })

onBeforeUnmount(() => stopAutoUpdate?.())
autoUpdate is the part people leave out and then spend a day debugging. Without it the
tooltip is positioned once and then drifts away from its target the moment anything scrolls, an
image loads, or a sidebar animates open.
4. The Spotlight Overlay
The classic approach is four absolutely-positioned divs forming a frame around the target. It works, the arithmetic is tedious, and rounded corners are impossible. An SVG mask is one element and handles the corners for free.
<template>
  <Teleport to="body">
    <svg v-if="rect" class="tour-overlay" :width="vw" :height="vh">
      <defs>
        <mask id="tour-hole">
          <rect :width="vw" :height="vh" fill="white" />
          <rect :x="rect.x - pad" :y="rect.y - pad"
                :width="rect.width + pad * 2" :height="rect.height + pad * 2"
                rx="8" fill="black" />
        </mask>
      </defs>
      <rect :width="vw" :height="vh" fill="rgba(12, 20, 40, 0.55)" mask="url(#tour-hole)" />
    </svg>
  </Teleport>
</template>

<style scoped>
.tour-overlay {
  position: fixed; inset: 0; z-index: 9998;
  pointer-events: none;          /* let the user click the highlighted control */
}
</style>
The <Teleport to="body"> is not optional. Render the overlay inside your component
tree and the first ancestor with overflow: hidden, a transform, or a
z-index stacking context will clip it, and you will conclude the mask is broken when
the mask is fine.
Keep rect in sync with the same autoUpdate loop that drives the tooltip, so
the hole and the tooltip never disagree about where the target is.
5. Surviving the Router, and Remembering
Vue Router is the piece the React version of this problem does not have in quite the same shape, because in Vue the router is usually the thing that swaps out whole subtrees. A tour that spans two routes must handle the transition explicitly.
const router = useRouter()

router.beforeEach((to, from, next) => {
  if (status.value === 'running') status.value = 'paused'
  next()
})

router.afterEach(async (to) => {
  if (status.value !== 'paused') return
  const step = current.value
  // Only resume if this step belongs on this route
  if (step.route && step.route !== to.name) return finish('aborted')
  status.value = 'running'
  await resolveCurrent()
})
Giving each step an optional route is worth the small extra config. Without it, a user
who clicks a link mid-tour ends up on the billing page with a tooltip pointing at nothing, and your
resolver's five-second timeout is the only thing that eventually rescues them.
Persistence: not localStorage alone
Almost every home-built tour stores tour_seen: true in localStorage. It is
one line and it is wrong in a specific, reportable way: local storage is per-browser and per-device.
The user who onboards on their laptop and opens the app on their desktop gets the whole tour again.
So does anyone in a private window, anyone who clears site data, and every user in an organisation
that resets browser profiles nightly.
async function markSeen(tourId, outcome) {
  try {
    await api.patch('/me/onboarding', { [tourId]: { outcome, at: new Date().toISOString() } })
  } catch {
    // network failure should not mean the user sees the tour twice today
    localStorage.setItem(`tour:${tourId}`, outcome)
  }
}
Record dismissed and completed separately. They are different signals: a tour people finish is working, a tour people escape from is a tax you are charging every new user. You cannot tell them apart from a single boolean.
What Stays Hard After It Works
The first version takes a couple of days and is genuinely satisfying. These are the items that turn up afterwards, in roughly the order teams hit them.
Selector coupling
Every step is a hard dependency on a DOM structure that your design system will change. Nothing
throws when it breaks: querySelector returns null and the step quietly
vanishes. Mitigate with dedicated data-tour="invoice-table" attributes rather than
classes or generated ids, and add a CI check that every selector in the step config resolves in
a rendered test build.
Virtual scrollers and v-if
A target inside a virtual list may not be mounted at all, and it will unmount again when the user
scrolls. Your MutationObserver can find it and then lose it mid-step. You need a
disappearance path as well as an appearance path: watch the resolved node, and if it
leaves the document, either re-resolve or end the step.
Localisation changes the layout
German copy runs roughly 30% longer than English, so a tooltip that fits below a button in English flips above it in German and now covers the thing it is describing. Arabic and Hebrew reverse your placements entirely. Test tour layouts in your longest language, not your default one; the mechanics are covered in localising in-app guides.
Mobile is a different product
At 375px there is often no room beside the target at all, so "tooltip anchored to element" degrades into "sheet at the bottom of the screen with the target scrolled into view". That is a separate rendering path, not a media query. Many teams end up shipping a shorter tour on mobile; see mobile onboarding patterns.
Accessibility is not a polish item
Each step is effectively a dialog: role="dialog", aria-modal, focus moved
into it on open, Tab trapped while open, focus restored on close, Escape to dismiss, and an
aria-live region announcing step changes. Respect
prefers-reduced-motion by dropping the smooth scroll and highlight animation. A tour
you cannot leave with the keyboard is a genuine barrier.
Server-side rendering
With Nuxt or any SSR setup there is no DOM at render time, so every part of this must be guarded
to the client. Put the tour behind <ClientOnly> and make sure the composable's
module-level state does not leak between requests on the server; module scope is shared across
requests in Node, which is a genuinely nasty class of bug.
The edit loop
This is the one that decides the economics. Your step config is a JavaScript file in a repo. Rewording step three means a branch, a review, a merge and a deploy. Changing which users see the tour means the same. Running a variant to test a different order means the same again. The tour content changes far more often than the tour code, and it is owned by people without commit access.
Build It, or Configure It?
Both answers are legitimate. The question is which problem you actually have.
✅ Build it in Vue when…
- The tour is a product feature: it reads your domain data, branches on state, or you sell it.
- The behaviour is unusual enough that no configurable tool expresses it.
- Content changes rarely and the people who change it can open a pull request.
- You have hard constraints: an air-gapped deployment, no third-party scripts at all.
⚠️ Configure it when…
- The tour is onboarding content that product, marketing or customer success will iterate on.
- You want to change targeting (new users only, one plan, one role) without a deploy.
- You need per-step analytics and A/B variants without building an experiment framework.
- Nobody on the team wants to own accessibility, i18n and mobile fallbacks for a tooltip engine.
The useful test is not "can we build this"; you can, it is a fortnight. It is: when the copy of step three needs changing, who does it, and how long until a user sees the change? If the honest answer is "a developer, next sprint", you have chosen the expensive option regardless of what the first estimate said. The full arithmetic is in build vs buy user onboarding.
Ship the tour without shipping the tour engine
Kompassify runs on your existing Vue app with a single script tag: no components to add, no selectors in your codebase, no deploy for a copy edit. Target resolution, positioning, spotlight, persistence, audience targeting and per-step analytics are handled, and your product or customer success team builds the steps visually. GDPR compliant, EU-hosted, and free up to 100 monthly active users, then from $129/mo.
Start for Free →A Pre-Launch Checklist
Whichever route you take, these are the things that separate a tour that helps from one that gets dismissed in two clicks.
- Every step is skippable and the tour is escapable, including when a target is missing.
- Selectors are
data-tourattributes, not classes, and are checked in CI. - Events fire on every transition, so you can read per-step drop-off.
- Completion is stored on the user, not only in
localStorage. - Dismissed and completed are separate outcomes.
- Keyboard: Escape closes, Tab is trapped, focus returns.
- Tested at 375px and in your longest language.
- The tour is short. Five steps that lead to one real action beat twelve that narrate the UI: the goal is activation, not a tour of the navigation.
One last thing worth internalising: the best tour is usually the shortest one that gets someone to their first real outcome. If your steps are describing the interface rather than moving the user toward something they wanted, the engineering above is solving the wrong problem. Designing a tour that converts is the part that decides whether any of this pays off.
Frequently Asked Questions
How do you build a product tour in Vue 3?
You need five pieces: a composable holding reactive tour state (step list, current index, status); a resolver that finds each step's target element and waits for it with nextTick plus a MutationObserver; a positioning layer, best handled by Floating UI's computePosition with autoUpdate so the tooltip follows its target on scroll and resize; a spotlight overlay teleported to the body and drawn as an SVG mask; and persistence so completion survives a route change and a reload. Model the state as a composable rather than a component, so anything in the app can start, skip or stop the tour without prop drilling. The first version is a couple of days of work.
Why does my Vue tour tooltip point at the wrong place?
Almost always because the position was computed once and never recomputed. Vue's reactivity does not know that the page scrolled, an image finished loading, or a sidebar animated open, all of which move the target. Use Floating UI's autoUpdate, which re-runs the position calculation on scroll, resize and ancestor layout changes, and stop it in onBeforeUnmount. The second common cause is a parent element with a CSS transform, which changes what position: fixed is relative to; teleporting the tooltip to the body avoids that entirely.
How do you anchor a Vue tour step to an element that has not rendered yet?
Do not rely on onMounted or a single querySelector. Await nextTick so Vue has flushed its current render, then await a MutationObserver watching document.body for the selector to appear, with a timeout of a few seconds. Resolve with null rather than rejecting when the timeout fires, because a missing target is an expected condition, not an exception. Then make an explicit product decision: skip the step if it is marked optional, otherwise end the tour and remove the overlay. Never leave the user trapped behind a dimmed screen.
Should the tour tooltip use Teleport?
Yes, teleport both the tooltip and the overlay to the body. Rendered inside your component tree, the first ancestor with overflow: hidden will clip them, the first ancestor with a z-index stacking context will bury them, and the first ancestor with a transform will break position: fixed. All three are common in real application layouts, and all three produce bugs that look like the overlay or mask is broken when it is fine. <Teleport to="body"> sidesteps the entire class of problem.
How do you handle a Vue Router navigation during a tour?
Handle it explicitly rather than hoping. In router.beforeEach, move the tour to a paused status if it is running. In router.afterEach, check whether the current step belongs on the new route (give each step an optional route name for this) and either re-resolve its target and resume, or end the tour cleanly. Without this, a user who clicks a link mid-tour lands on another page with a tooltip anchored to an element that no longer exists, and only the resolver's timeout eventually rescues them.
How do you stop a Vue product tour from showing again?
Persist the outcome against the user record on your server, not only in localStorage. Local storage is per-browser and per-device, so the user who onboards on a laptop sees the whole tour again on their desktop, in a private window, or after clearing site data. Store dismissed and completed as separate outcomes rather than a single boolean: a tour people finish is working, and a tour people escape from is a tax on every new user, and one flag cannot tell you which you have.
How do you make a Vue product tour accessible?
Treat every step as a dialog. Give the step container role="dialog" with aria-modal, move focus into it when it opens, trap Tab inside while it is open, restore focus to the previously focused element when it closes, and make Escape dismiss the tour. Announce step changes through an aria-live region so screen-reader users hear the new content. Respect prefers-reduced-motion by disabling smooth scrolling and highlight animations. A tour that cannot be dismissed from the keyboard is a genuine accessibility barrier, not a rough edge.
Is it worth building a product tour in Vue, or using a no-code tool?
Build it when the tour is a genuine product feature: reading your domain data, branching on state, or something you sell. Configure it when the tour is onboarding content that product, marketing or customer success will iterate on, because the real cost is not the first version but every subsequent edit passing through an engineering backlog and a release. The deciding question is: when the copy of step three needs changing, who does it and how long until a user sees it? If the answer is "a developer, next sprint", building is the more expensive option whatever the original estimate said. The full comparison is in build vs buy user onboarding.