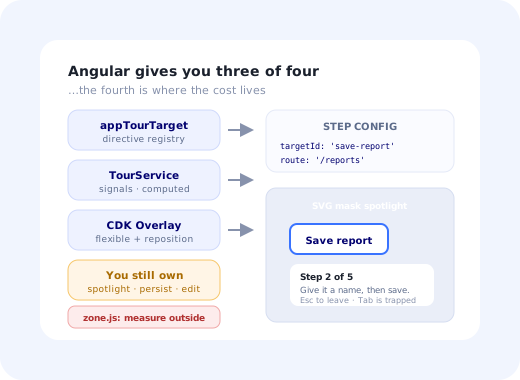
Angular is the framework where building a product tour looks the most tractable, because the platform already ships most of the parts. The CDK has an overlay system with a positioning engine that has been solving flip-and-shift for years. You have dependency injection for a service that any component can reach. You have RxJS for the stream of scroll and resize events that a tour has to react to.
So the first version really is a day's work. What you discover afterwards is that the hard parts of
a tour are not the parts Angular helps with. The CDK positions a tooltip beautifully next to an
element that exists. It has no opinion about an element that has not been rendered because a
resolver is still fetching, or one that lives inside an *ngIf that flipped, or one
that a lazy-loaded route has not created yet.
This guide builds an Angular product tour the way the framework wants it built (a singleton service holding signal-based state, a structural directive for marking targets, the CDK Overlay for positioning, and an SVG spotlight) and then covers the seven things that stay hard, and how to tell whether this belongs in your codebase at all.
Key Takeaways
- Use the CDK Overlay, do not write positioning yourself.
FlexibleConnectedPositionStrategyalready handles flip, push and scroll reposition. - Mark targets with a directive, not CSS selectors.
appTourTarget="save-report"registers anElementRefand de-registers on destroy: no querySelector, no silent breakage. - A registry beats the DOM. The directive writes into a service map, so "is this target available yet" becomes a signal you can await instead of a poll.
- Mind zone.js. Scroll and resize listeners outside the zone will not trigger change detection; inside it they will trigger far too much.
- Lazy routes need explicit handling: pause the tour on
NavigationStart, re-resolve onNavigationEnd, and abandon cleanly if the step does not belong there. - The build is cheap; the edit loop is the cost. If rewording step three needs a release, that is the design flaw, not the code.
The Real Surface Area
Before the code, the honest scope. Most estimates cover the first two rows of this table, which is why the classic one-sprint tour turns into a recurring line item.
| Piece | What Angular gives you | What you still own |
|---|---|---|
| Step state | An injectable service, signals or a store. | The step list lives in code; every copy edit is a deploy. |
| Target registration | Directives give you ElementRef for free. |
Waiting for targets that do not exist yet; cleanup on destroy. |
| Positioning | CDK Overlay + FlexibleConnectedPositionStrategy. Genuinely excellent. |
Choosing fallbacks per step; RTL; very long translations. |
| Spotlight | A backdrop, but a plain dim: no cut-out. | The mask, keeping it in sync, pointer-events policy. |
| Persistence & targeting | Nothing. | Who sees it, when, once or again, and on which device. |
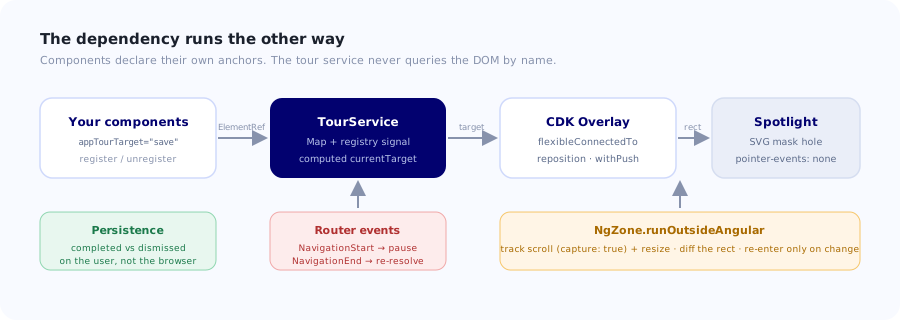
An Angular tour is a service, a directive registry and a CDK overlay; the router and persistence are the parts you own entirely.
1. Register Targets With a Directive, Not a Selector
This is the single decision that separates an Angular tour that ages well from one that quietly rots.
The obvious approach is to put CSS selectors in your step config and call
document.querySelector. It works, and then a design-system upgrade renames a class and
step four silently stops anchoring, silently, because a missing element is not an exception.
A directive inverts the dependency. The component that owns the element declares that it is a tour target, and the tour service never touches the DOM by name.
import { Directive, ElementRef, Input, OnDestroy, OnInit, inject } from '@angular/core'
import { TourService } from './tour.service'

@Directive({ selector: '[appTourTarget]', standalone: true })
export class TourTargetDirective implements OnInit, OnDestroy {
  @Input('appTourTarget') id!: string

  private el   = inject(ElementRef<HTMLElement>)
  private tour = inject(TourService)

  ngOnInit()    { this.tour.registerTarget(this.id, this.el) }
  ngOnDestroy() { this.tour.unregisterTarget(this.id) }
}<button appTourTarget="save-report" class="btn-primary">
Save report
</button>
Now a refactor that deletes the button also deletes the registration, and a step pointing at
save-report knows immediately that its target is gone rather than pointing at nothing.
You can also assert in a unit test that every id referenced by the step config is registered somewhere
in the app, a check that is impossible with raw selectors.
2. The Tour Service
One injectable, provided in root, holding the state as signals. Anything in the application (a settings button, a route guard, an analytics callback) can start or stop the tour by injecting it.
@Injectable({ providedIn: 'root' })
export class TourService {
  private targets = new Map<string, ElementRef<HTMLElement>>()
  private registry = signal(0)                     // bumped on every register/unregister

  readonly steps  = signal<TourStep[]>([])
  readonly index  = signal(-1)
  readonly status = signal<'idle' | 'running' | 'paused' | 'done'>('idle')

  readonly current = computed(() => this.steps()[this.index()] ?? null)
  readonly isLast  = computed(() => this.index() === this.steps().length - 1)

  /** Recomputes whenever the registry changes: no polling. */
  readonly currentTarget = computed(() => {
    this.registry()
    const step = this.current()
    return step ? this.targets.get(step.targetId) ?? null : null
  })

  registerTarget(id: string, el: ElementRef<HTMLElement>) {
    this.targets.set(id, el)
    this.registry.update(n => n + 1)
  }

  unregisterTarget(id: string) {
    this.targets.delete(id)
    this.registry.update(n => n + 1)
  }
}
The registry counter is the trick worth stealing. A Map is not reactive, so
bumping a signal on every mutation gives you a currentTarget computed that recalculates
the moment a late-rendering component registers itself. No MutationObserver, no polling
interval: the target simply appears.
Still keep a timeout. A component that never renders (because a permission check failed, or a feature flag is off, or a request errored) will never register. Give each step a deadline, then either skip it (if it is optional) or end the tour and take the overlay down. A tour that stalls behind a dimmed screen is worse than no tour, and it is a recurring theme in the onboarding mistakes teams keep repeating.
3. Positioning With the CDK Overlay
Do not write this yourself. FlexibleConnectedPositionStrategy already implements the
behaviour you would spend two days rebuilding badly: preferred placement, ordered fallbacks, pushing
back into the viewport, and repositioning on scroll.
private overlay = inject(Overlay)
private ref?: OverlayRef

show(target: ElementRef<HTMLElement>, step: TourStep) {
  this.ref?.dispose()

  const position = this.overlay.position()
    .flexibleConnectedTo(target)
    .withPositions([
      { originX: 'center', originY: 'bottom', overlayX: 'center', overlayY: 'top',    offsetY: 12 },
      { originX: 'center', originY: 'top',    overlayX: 'center', overlayY: 'bottom', offsetY: -12 },
      { originX: 'end',    originY: 'center', overlayX: 'start',  overlayY: 'center', offsetX: 12 },
      { originX: 'start',  originY: 'center', overlayX: 'end',    overlayY: 'center', offsetX: -12 },
    ])
    .withPush(true)
    .withViewportMargin(8)

  this.ref = this.overlay.create({
    positionStrategy: position,
    scrollStrategy: this.overlay.scrollStrategies.reposition({ autoClose: false }),
    hasBackdrop: false,           // we draw our own: see the spotlight below
  })

  this.ref.attach(new ComponentPortal(TourStepComponent))
  target.nativeElement.scrollIntoView({ block: 'center', behavior: 'smooth' })
}
Two flags matter more than they look. scrollStrategies.reposition with
autoClose: false keeps the tooltip glued to its target while the page scrolls instead of
closing the overlay, which is the default behaviour for menus and exactly wrong for a tour. And
withPush(true) is what stops a step near the viewport edge from rendering half
off-screen.
4. The Spotlight Overlay
The CDK backdrop dims the whole page, which is not what a tour wants; a tour wants everything dimmed except the target. Four positioned divs around the element will do it, with tedious arithmetic and no rounded corners. An SVG mask does it in one element.
@Component({
  selector: 'app-tour-spotlight',
  standalone: true,
  template: `
    @if (rect(); as r) {
      <svg class="spotlight" [attr.width]="vw()" [attr.height]="vh()">
        <defs>
          <mask id="tour-hole">
            <rect [attr.width]="vw()" [attr.height]="vh()" fill="white" />
            <rect [attr.x]="r.x - 6"     [attr.y]="r.y - 6"
                  [attr.width]="r.width + 12" [attr.height]="r.height + 12"
                  rx="8" fill="black" />
          </mask>
        </defs>
        <rect [attr.width]="vw()" [attr.height]="vh()"
              fill="rgba(12,20,40,0.55)" mask="url(#tour-hole)" />
      </svg>
    }
  `,
  styles: [`
    .spotlight { position: fixed; inset: 0; z-index: 999; pointer-events: none; }
  `],
  changeDetection: ChangeDetectionStrategy.OnPush,
})
pointer-events: none is a product decision, not a styling one. With it, the user can
click the highlighted control and complete the action the step is describing, which is what you want
for a tour that teaches by doing. Without it, the tour is a slideshow the user watches. Prefer the
former; a step that asks someone to actually click the thing is worth several that describe it.
Keeping the rectangle honest
The hole has to track the target through scrolls, resizes and layout shifts. This is where zone.js
bites: a plain window.addEventListener('scroll') registered inside the zone triggers
change detection on every scroll frame across your entire application.
private zone = inject(NgZone)

private track(el: HTMLElement) {
  this.zone.runOutsideAngular(() => {
    const update = () => {
      const r = el.getBoundingClientRect()
      // only re-enter the zone when the rect actually changed
      if (sameRect(r, this.lastRect)) return
      this.lastRect = r
      this.zone.run(() => this.rect.set(r))
    }

    const ro = new ResizeObserver(update)
    ro.observe(el)
    window.addEventListener('scroll', update, { passive: true, capture: true })
    window.addEventListener('resize', update, { passive: true })
    this.cleanup = () => { ro.disconnect(); /* remove listeners */ }
  })
}
capture: true on the scroll listener matters: scroll events from an inner scrollable
container do not bubble to window, so without capture the spotlight drifts whenever the
target lives inside a scrolling panel, a very common layout in Angular admin applications.
5. Lazy Routes and Navigation
A tour spanning more than one route has to cooperate with the router explicitly. With lazy-loaded modules the destination's components do not even exist until the chunk arrives, so "wait for the target" and "wait for the route" are two different waits.
constructor() {
  inject(Router).events.pipe(takeUntilDestroyed()).subscribe(event => {
    if (event instanceof NavigationStart && this.status() === 'running') {
      this.status.set('paused')
      this.overlay.hide()
    }
    if (event instanceof NavigationEnd && this.status() === 'paused') {
      const step = this.current()
      if (step?.route && !event.urlAfterRedirects.startsWith(step.route)) {
        return this.finish('abandoned')      // user navigated away from the tour
      }
      this.status.set('running')
      this.resolveCurrent()                  // the registry signal handles the rest
    }
  })
}
Hiding the overlay on NavigationStart rather than leaving it up is the detail users
notice. A dimmed screen persisting across a page transition, with a tooltip pointing at a component
that is being destroyed, reads as a broken application.
Persistence: not localStorage alone
The one-line version stores tourSeen: true in localStorage. It is wrong in a
specific and very reportable way: local storage is per-browser and per-device. Onboard on a laptop,
open the app on a desktop, and the entire tour runs again. So does a private window, a cleared cache,
and every user in an organisation whose browser profiles reset overnight.
async markSeen(tourId: string, outcome: 'completed' | 'dismissed') {
  try {
    await firstValueFrom(
      this.http.patch('/api/me/onboarding', { [tourId]: { outcome, at: new Date().toISOString() } })
    )
  } catch {
    localStorage.setItem(`tour:${tourId}`, outcome)   // don't punish a network blip
  }
}
Record completed and dismissed as different outcomes. A tour people finish is doing its job; a tour people escape is a toll you charge every new user. A single boolean cannot tell you which one you have shipped.
What Stays Hard After It Works
The first version is genuinely quick in Angular. These are the things that arrive later, roughly in the order teams meet them.
Targets that never arrive
The directive registry solves late rendering elegantly, but not absence. A component behind a permission check, a feature flag, or a failed request never registers at all. Every step needs a deadline and an explicit policy: skip, or end the tour cleanly. Silence is the one option that is never acceptable.
Change detection and performance
Tracking a rectangle through scroll is a per-frame operation happening while a modal-ish overlay is open. Get the zone boundaries wrong and you will ship a tour that makes the whole application feel sluggish, in a way that only shows up on lower-end hardware. Measure outside the zone, diff the rect, and only re-enter when it genuinely changed.
Virtual scroll
The CDK's own cdk-virtual-scroll-viewport destroys and recreates items as the user
scrolls, so a registered target can vanish mid-step and register again under the same id
moments later. Your currentTarget computed will handle the reappearance; what you
must add is a graceful response to the disappearance, rather than a spotlight over empty space.
Translation changes the geometry
German copy runs roughly 30% longer than English, so a step that fits below a control in English flips above it in German and covers the thing it is pointing at. RTL locales mirror your placement list entirely. Test tours in your longest language, not your default; the practicalities are in localising in-app guides.
Small viewports are a separate design
At 375px there is frequently no room beside the target, so "tooltip anchored to element" has to degrade to "sheet at the bottom, target scrolled into view". That is a different rendering path, not a media query, and most teams end up shipping a shorter mobile tour. See mobile onboarding patterns.
Accessibility
The CDK's a11y package gives you FocusTrap and LiveAnnouncer,
which is a real head start; use both. Each step is a dialog: role="dialog",
aria-modal, focus moved in on open and restored on close, Escape dismisses, and step
changes announced politely. Respect prefers-reduced-motion by dropping the smooth
scroll. A tour you cannot leave from the keyboard is a barrier, not a rough edge.
The edit loop, the one that decides the economics
Your step config is a TypeScript file. Rewording step three is a branch, a review, a merge and a deploy. Changing who sees the tour is the same. Testing a shorter variant is the same again. Tour content changes far more often than tour code, and the people who want to change it usually do not have commit access.
Build It, or Configure It?
Both answers are defensible. The question is which problem you have.
✅ Build it in Angular when…
- The tour is a product feature: it reads domain data, branches on state, or you sell it.
- Its behaviour is unusual enough that no configurable tool expresses it.
- Content changes rarely, and whoever changes it can open a pull request.
- You have hard constraints: an air-gapped deployment, or a strict no-third-party-script policy.
⚠️ Configure it when…
- The tour is onboarding content that product or customer success will iterate on weekly.
- Targeting needs to change (new users only, one plan, one role) without a release.
- You want per-step analytics and variants without building an experiment framework.
- Nobody wants to own i18n, mobile fallbacks and accessibility for a tooltip engine forever.
The deciding question is not whether your team can build it. It is: when the copy of step three needs changing, who does it and how long until a user sees the change? If the honest answer is "an engineer, next sprint", you have picked the expensive option no matter how small the original estimate was. The arithmetic is laid out in build vs buy user onboarding.
Ship the tour without owning the tour engine
Kompassify runs on your existing Angular application from a single script tag: no directives to add, no step config in your repo, no deploy for a copy change. Target resolution, positioning, spotlight, persistence, audience targeting and per-step analytics are handled, and your product or customer success team builds the steps visually. GDPR compliant, EU-hosted, free up to 100 monthly active users and from $129/mo after that.
Start for Free →Pre-Launch Checklist
Whichever route you choose, these are what separate a tour that helps from one dismissed in two clicks.
- Every step is skippable, and the tour is always escapable, including when a target never registers.
- Targets are directive ids, not CSS selectors, and a test asserts every configured id exists.
- Scroll and resize tracking runs outside the zone, with a rect diff before re-entering.
- Events fire on every transition, so you can read per-step drop-off rather than a completion rate.
- Completion is stored on the user, with
localStorageonly as a fallback. - Dismissed and completed are distinct outcomes.
- Escape closes, Tab is trapped, focus returns, steps are announced.
- Tested at 375px and in your longest language.
- The tour is short: five steps ending in one real action beat twelve narrating the navigation. The goal is activation, not coverage.
Worth keeping in view: all of the engineering above is in service of getting one person to one useful outcome faster. If your steps describe the interface rather than move someone toward something they actually wanted, no amount of CDK positioning will save the tour. Designing a product tour that converts is the half that decides whether the code pays for itself.
Frequently Asked Questions
How do you build a product tour in Angular?
Four pieces. A standalone directive that components apply to their own elements, registering an ElementRef under a stable id with a root-provided service. A tour service holding step list, current index and status as signals, exposing a computed current target that recalculates whenever the registry changes. The CDK Overlay with a FlexibleConnectedPositionStrategy to place the step tooltip, using a reposition scroll strategy so it follows the target rather than closing. And a spotlight component drawing an SVG mask over the page with a hole at the target's bounding box. Persistence and audience targeting are yours to build on top.
Should Angular tour steps use CSS selectors or a directive?
A directive, almost always. With CSS selectors in the step config, a design-system upgrade that renames a class breaks a step silently, because querySelector returning null is not an exception. With a directive the component that owns the element declares itself a tour target, so deleting the element also deletes the registration, and you can write a unit test asserting that every target id referenced by the step config is registered somewhere in the application. That test is impossible with raw selectors.
How do you position a tour tooltip in Angular?
Use the CDK Overlay rather than writing positioning yourself. FlexibleConnectedPositionStrategy already implements preferred placement with ordered fallbacks, pushing the overlay back into the viewport, and repositioning on scroll: the behaviour you would otherwise spend two days rebuilding badly. Two settings matter: use scrollStrategies.reposition with autoClose: false, so scrolling moves the tooltip instead of closing it, and enable withPush so a step near the viewport edge does not render half off-screen.
How do you draw a spotlight around a tour target in Angular?
The CDK backdrop dims the whole page, which is not what a tour needs. Render a fixed, full-viewport SVG with a mask: a white rectangle covering the viewport, and a black rounded rectangle at the target's bounding box, then fill the viewport with a semi-transparent colour using that mask. It is one element and handles rounded corners for free, unlike the four-div technique. Set pointer-events: none so the user can actually click the control the step is describing.
How do you stop an Angular tour from hurting change detection?
Register the scroll and resize listeners inside NgZone.runOutsideAngular, compare the new bounding rectangle against the last one, and only call zone.run to update the signal when it actually changed. Tracking a rectangle through scroll is a per-frame operation, so a listener registered inside the zone triggers change detection across the whole application on every frame. Also use capture: true on the scroll listener, because scroll events from an inner scrollable container do not bubble to window.
How do you handle lazy-loaded routes during an Angular tour?
Subscribe to router events. On NavigationStart, if the tour is running, move it to a paused status and hide the overlay; leaving a dimmed screen up across a page transition reads as a broken application. On NavigationEnd, check whether the current step belongs on the new URL by giving each step an optional route prefix, then either resume and re-resolve the target, or end the tour cleanly because the user navigated away. With lazy modules the destination components do not exist until the chunk loads, so waiting for the route and waiting for the target are two separate waits.
How do you make an Angular product tour accessible?
The CDK's a11y package gives you a real head start: use FocusTrap to keep Tab inside the step while it is open and LiveAnnouncer to announce step changes politely. Treat each step as a dialog with role="dialog" and aria-modal, move focus into it when it opens, restore focus to the previously focused element when it closes, and make Escape dismiss the tour. Respect prefers-reduced-motion by disabling smooth scrolling and highlight animation. A tour that cannot be dismissed from the keyboard is a genuine accessibility barrier.
Is it worth building a product tour in Angular, or using a no-code tool?
Build it when the tour is a genuine product feature: reading your domain data, branching on state, or something you sell. Configure it when the tour is onboarding content that product, marketing or customer success will iterate on, because the real cost is not the first version but every subsequent edit passing through an engineering backlog and a release. The question that decides it: when the copy of step three needs changing, who does it and how long until a user sees the change? If the answer is "an engineer, next sprint", building is the more expensive option regardless of the original estimate. The full comparison is in build vs buy user onboarding.