
A new user signs up. They land on your dashboard. And then... nothing. They poke around for a minute, get confused, and close the tab. Two days later, they cancel.
This is not a product problem. It is an onboarding problem. The gap between someone creating an account and someone experiencing real value is where most SaaS churn actually happens. According to ABBYY's State of Automation Report, 9 in 10 companies lose up to 40% of users during onboarding, before those users have seen what the product actually does for them.
A well-built user onboarding checklist closes that gap. It gives new users a clear, step-by-step path to their first meaningful outcome, the moment that separates people who activate from people who quietly disappear.
Key Takeaways
- Map to activation, not setup. Checklist items should correlate with your retention data, not just tasks that are easy to explain.
- Keep it to 3–5 steps. Every item beyond five adds measurable drop-off before users reach their aha moment.
- Lead with value, not configuration. The fastest path to activation is showing users what your product does for them before asking them to set anything up.
- Personalize by segment. An Admin needs a different checklist than a Member. A free user needs different steps than an Enterprise customer.
- Pair it with a product tour. The tour orients. The checklist activates. Together, they are the most complete new-user onboarding pattern available.
- Measure activation, not just completion. A 78% completion rate with a flat activation rate means your checklist is driving the wrong behavior.
- Iterate without engineering. No-code tools let you test and improve your checklist weekly, not quarterly.

What Is a User Onboarding Checklist?
A user onboarding checklist is a short, structured list of tasks that guides new users from sign-up to their first meaningful outcome inside your product. Each item represents a step toward activation, the point at which a user stops being a sign-up and starts experiencing the real value your product delivers.
As users complete each task, it gets checked off. That visual progress does something important: it taps into the psychology of completion. Seeing items ticked one by one creates momentum and motivates users to keep going, the same mechanism that makes progress bars in games so effective at keeping players engaged.
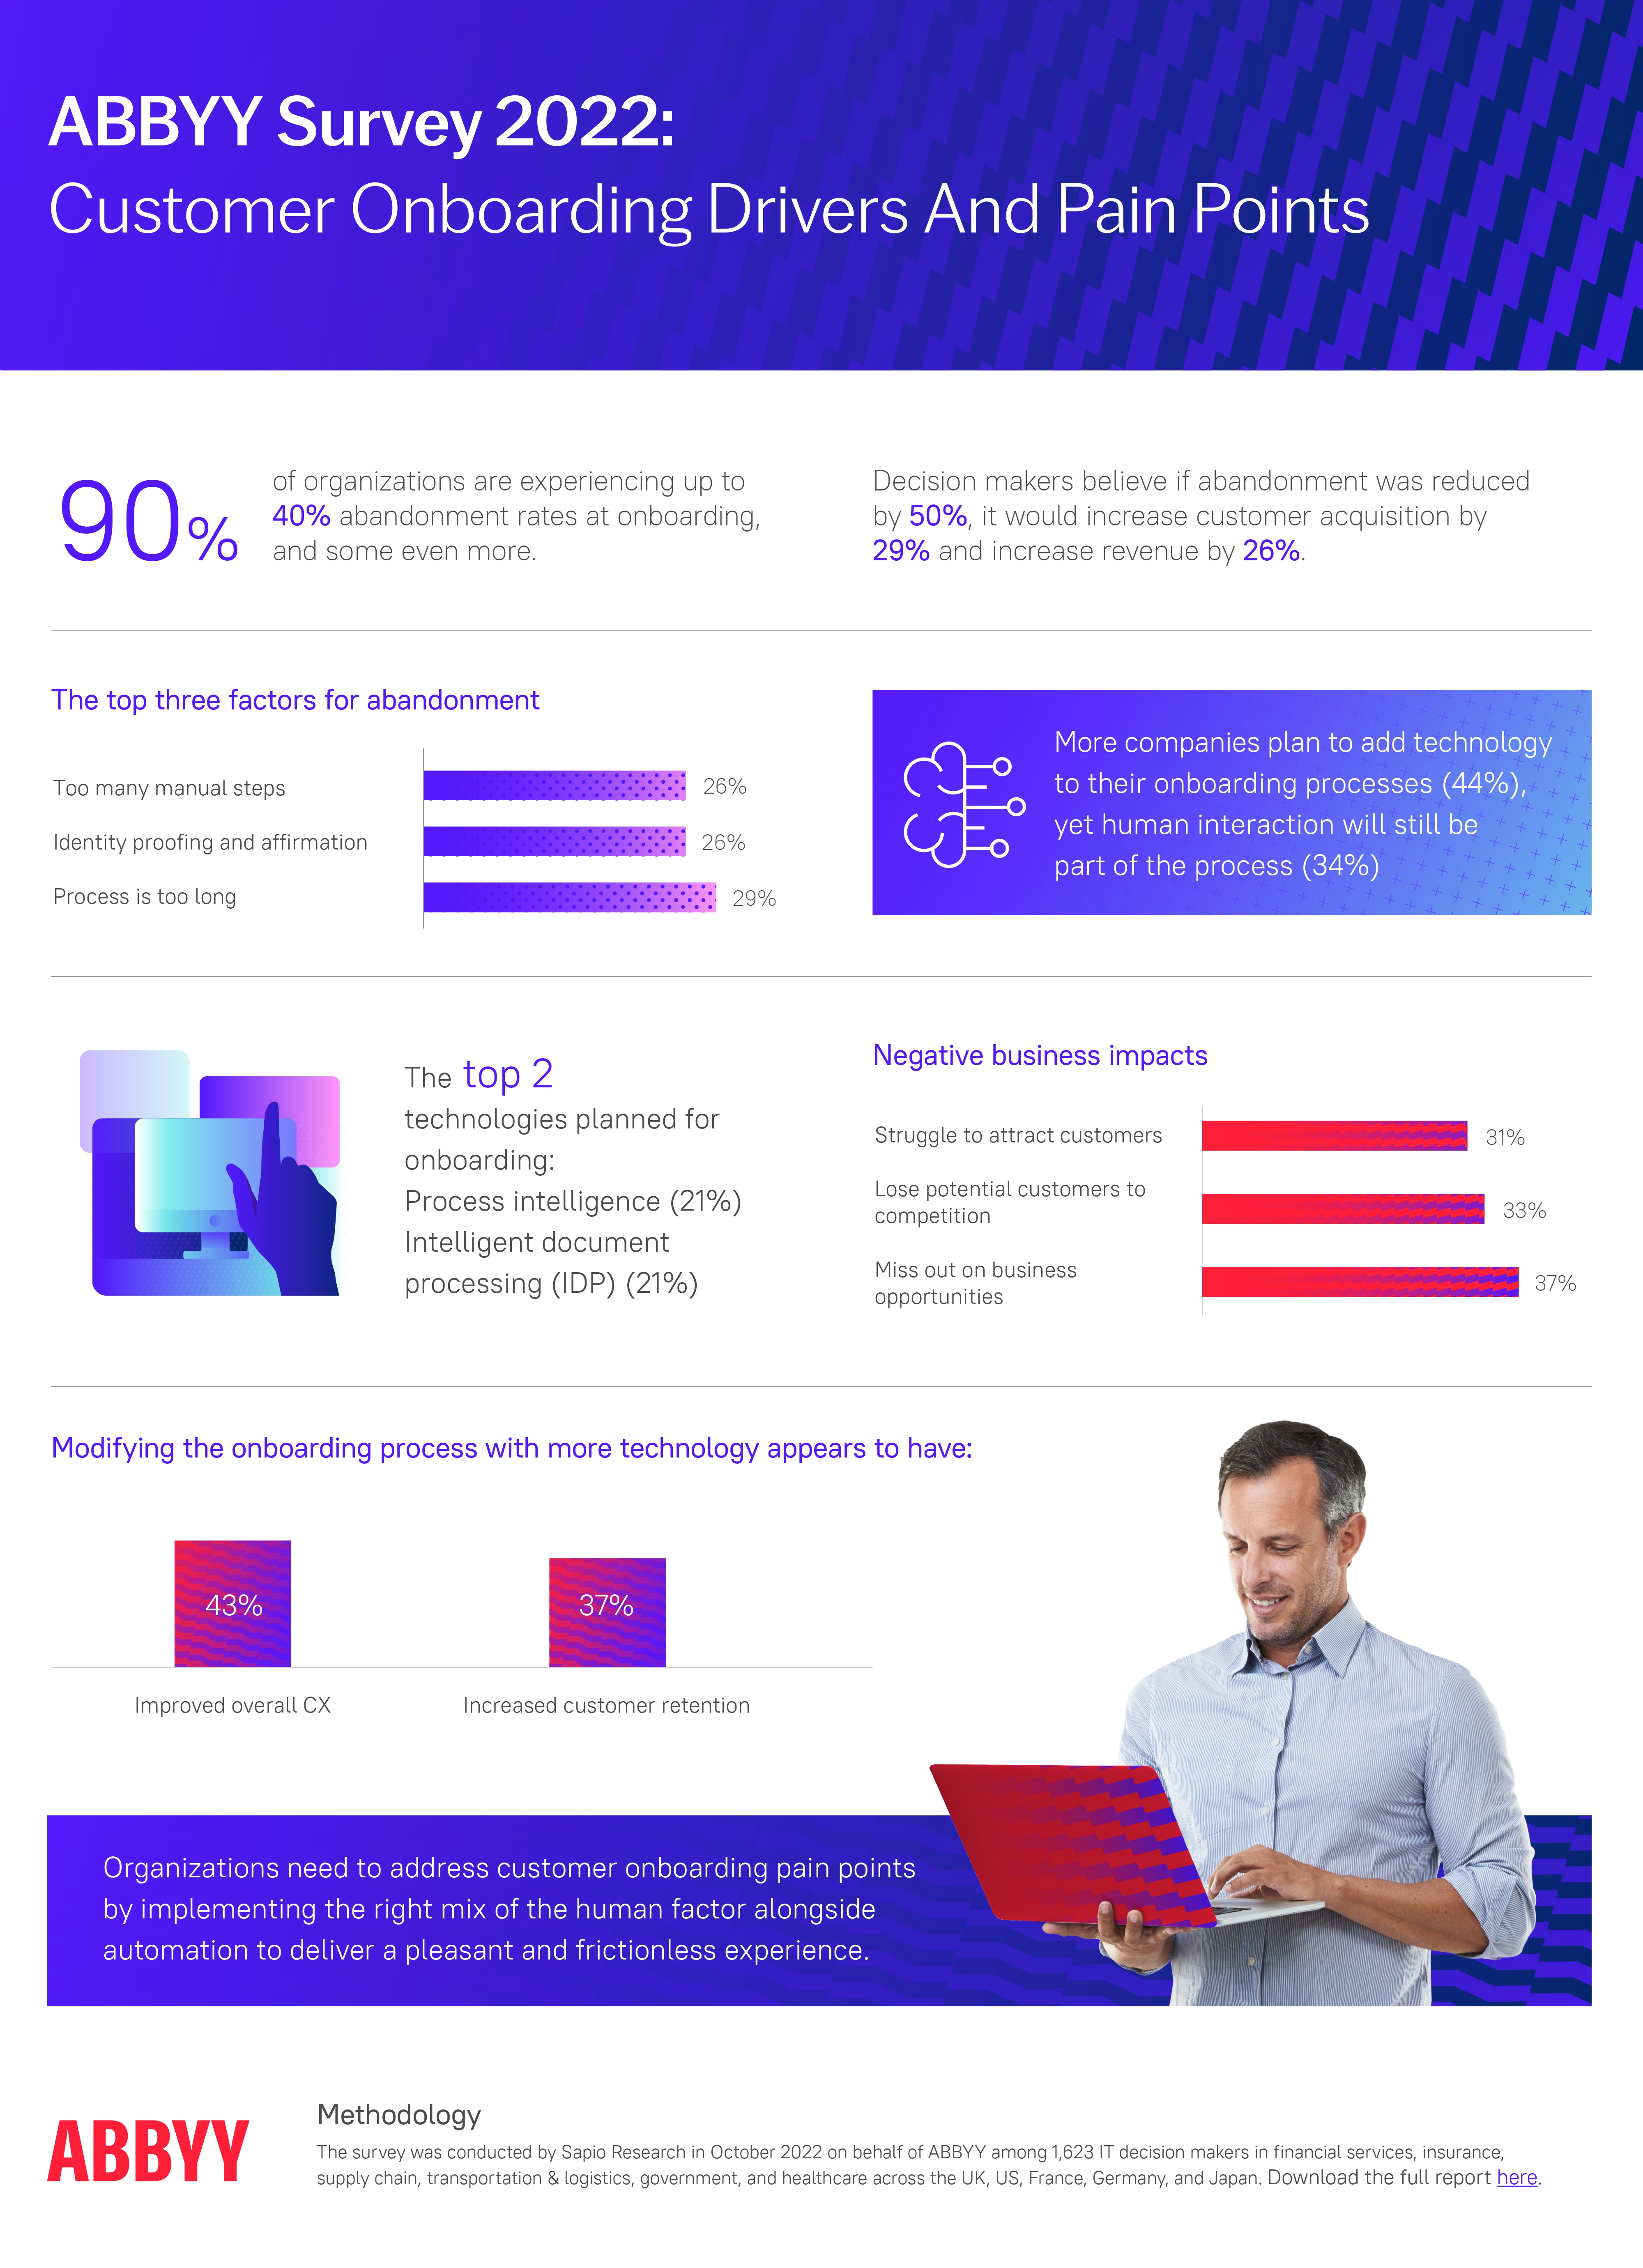
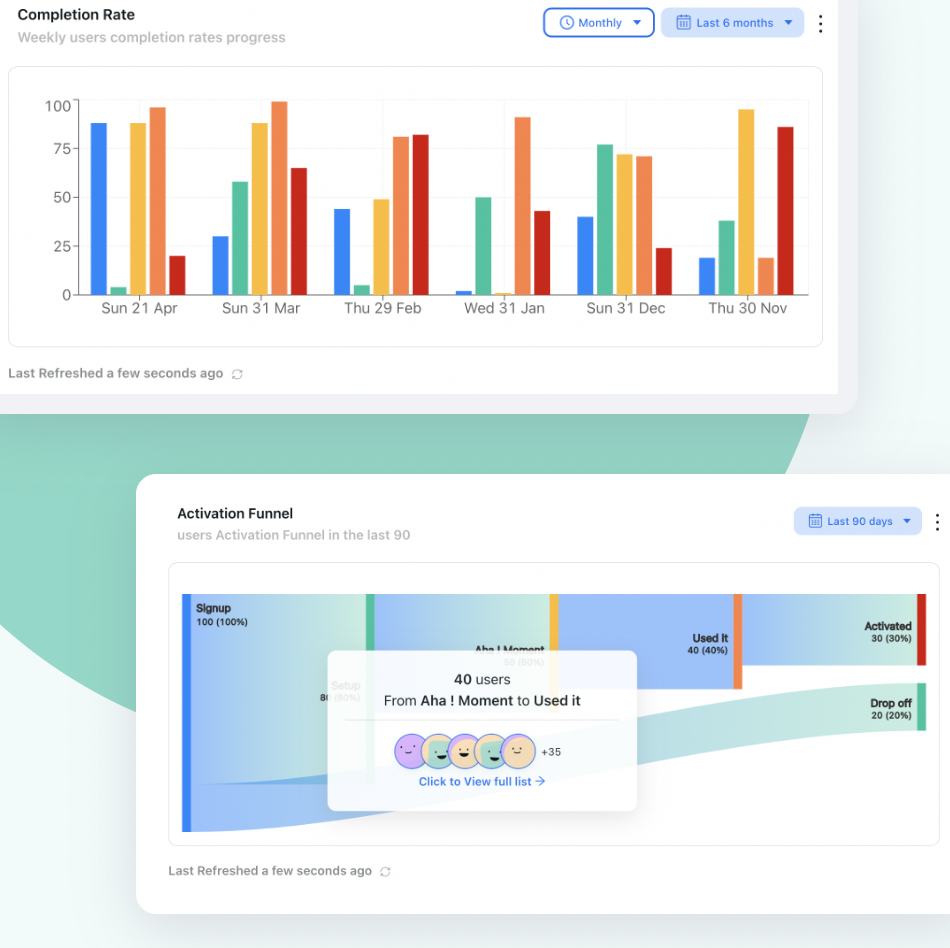
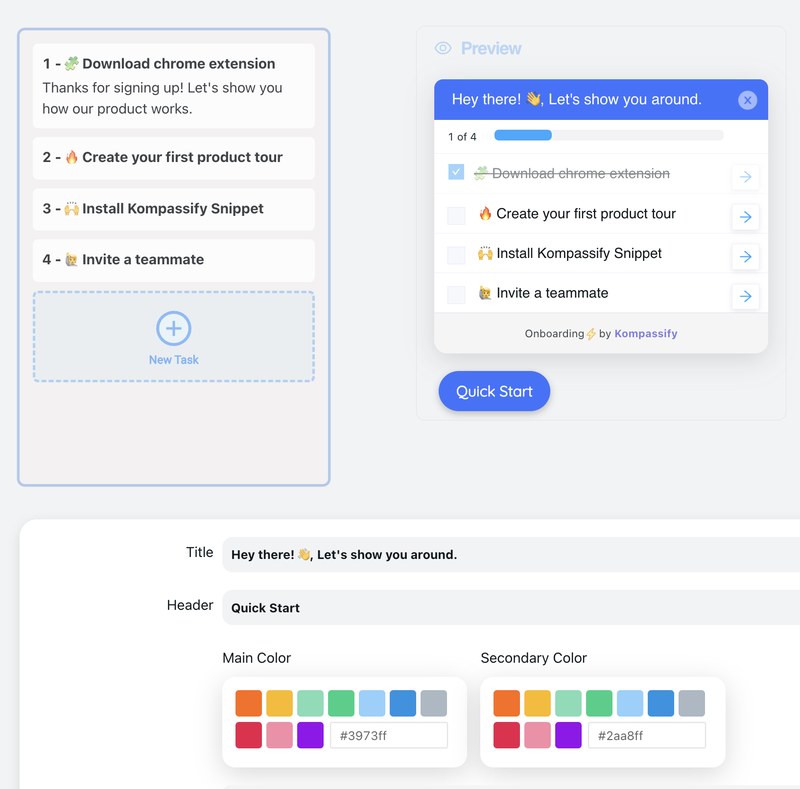
A Kompassify onboarding checklist, progress tracking, collapsible widget, task-by-task completion.
Why Onboarding Checklists Work
A checklist is one of the simplest UI patterns in software. So why does it consistently outperform more sophisticated onboarding formats? Because it works with human psychology rather than against it.
- They compress time to first value. Every hour between sign-up and the aha moment is a window for churn. Checklists eliminate wrong turns and hand users a roadmap with the next step already marked.
- They tap into completion psychology. Seeing tasks checked off creates a feedback loop: each completed item reinforces the decision to keep going. Users who start your checklist are significantly more likely to finish it, and return the next day.
- They introduce features gradually. Rather than overwhelming users with everything at once, a checklist sequences functionality one action at a time, in the order that makes the most sense for the user's journey.
- They reveal exactly where onboarding breaks. A properly instrumented checklist gives you step-level drop-off data. You can see not just that users churn before activation, but exactly which step they abandoned and what they did next.
- They scale across segments without multiplying maintenance. Admin users see different tasks than Members. Free users see different steps than Enterprise customers. One template, multiple experiences, without maintaining eight separate flows.
The Onboarding Framework: Awareness → Activation → Retention
Effective onboarding is not a single checklist. It is a staged experience that delivers the right guidance at the right moment, based on where a user is in their journey.
| Stage | Goal | Checklist focus | Key metric |
|---|---|---|---|
| 🔍 Awareness | Orient users: what does this product do? | Lightweight, educational steps | First session duration |
| ⚡ Activation | Drive users to their first meaningful outcome | Task-oriented, action-driven steps | Activation rate (week 1) |
| 🔁 Retention | Build habits and deepen engagement | Advanced feature discovery, triggered contextually | 30-day retention rate |
The user activation funnel, each stage requires a different onboarding approach and different success metrics.
Most teams focus all their onboarding energy on the awareness stage and wonder why activation rates stay flat. The insight here is that awareness and activation require different checklist designs, different triggers, and different success metrics. Building one generic checklist that tries to cover both usually serves neither well.
How to Create a User Onboarding Checklist in 7 Steps
A checklist built on guesswork is how you end up with high completion rates and flat activation. A checklist built on data is how you move the numbers that matter. Here is the framework.
Define your activation event
Map the user journey
Choose 3–5 activation-correlated tasks
Sequence tasks so value comes first
Write task copy that focuses on outcomes, not actions
Add contextual support at every step
Instrument, measure, and iterate
1. Define your activation event
Before you write a single checklist item, you need to know what activation looks like for your product. Activation is not signing up. It is not completing a profile. It is the specific action, or combination of actions, that predicts whether a user will still be paying you in 90 days.
Pull your cohort data. Compare users who are still active after week four against users who churned. Which actions did the retained group consistently take in their first session? That is your activation event. Everything in your checklist should trace a path toward it.
2. Map the user journey
Interview users who are not yet deeply familiar with your product. Ask them: what is their process like without your tool? Where would they start? What steps would they expect to take in sequence? User journey mapping turns assumptions about onboarding into evidence-based design.
The goal is to understand your users' mental model, not to force them into the workflow that makes most sense from your side of the product. The best checklists feel intuitive because they follow the sequence a user would naturally expect, not the sequence an engineer would build.
3. Choose 3–5 activation-correlated tasks
Take your activation event and work backwards: what is the minimum set of actions a user needs to take to reach it? Those are your checklist items.
Be ruthless. Remove any task that does not directly contribute to activation, even if it feels important from a product-completeness perspective. "Complete your profile" stays only if your data shows that profile completion predicts week-four retention. If it does not, it belongs somewhere else, not in the primary onboarding checklist. Research consistently points to 3–5 items as the optimal range. Every step beyond five adds measurable drop-off.
4. Sequence tasks so value comes first
The order of checklist items matters enormously. A common failure pattern: configure workspace → set permissions → customize settings → then start using the product. Users abandon this sequence because they hit three configuration screens before they have seen what your product actually does.
The fix is simple: let users experience value before you ask them to set anything up. Users who get a quick win in step one complete the full checklist at significantly higher rates than users who are asked to configure settings first. The sequence determines whether users build momentum or lose interest.
5. Write task copy that focuses on outcomes, not actions
There is a meaningful difference between "Upload a CSV" and "Import your first data set and see your dashboard come to life." Both describe the same action, but one frames it as a chore and one frames it as a milestone. Users engage with outcomes, not instructions.
For each checklist item, ask: what does the user gain when they complete this? Write the item in terms of that gain. Keep the language direct and specific, the task should be completable in under 2 minutes with no additional guidance needed.
6. Add contextual support at every step
A checklist without support is a list of things to do. A checklist with contextual support is a guided experience. For each item, consider what a user might need help with, and deliver it exactly when and where they need it: a tooltip when they click a task, a short video that auto-plays when they navigate to the relevant page, an inline hint at the right moment.
The goal is to eliminate every moment of uncertainty before the user has a chance to abandon the task.
7. Instrument, measure, and iterate
Ship your checklist as a hypothesis, not as a finished product. Track step-level drop-off from day one. Compare the activation rate of users who completed the checklist against users who did not. Look at 30-day retention by cohort, segmented by checklist completion.
If completion rates are high but activation stays flat, your items do not correlate with the outcomes that predict retention. If drop-off spikes at a specific step, that step has a friction problem: rewrite the copy, add contextual support, or remove it entirely.
Build your onboarding checklist in minutes, no code needed
With Kompassify, your product and growth team can create, launch, and A/B test onboarding checklists without touching the codebase. See activation metrics move in days, not quarters.
Start for Free →Onboarding Checklist Best Practices: What Works vs. What Kills Performance
Building the checklist is one thing. Making it perform is another. Here is what separates high-activation checklists from high-completion ones.
✅ Do
- Personalize by segment from day one: role, plan, or use case
- Place the checklist where it's always visible but never blocking
- Show a progress bar above the task list at all times
- Pair it with a short 3–4 step product tour immediately after sign-up
- Use behavioral triggers, not time-based ones
- Follow up by email for users who don't finish in the first session
- A/B test task order and copy continuously
- Measure 30-day retention segmented by checklist completion
❌ Don't
- Choose tasks based on what's easy to explain, not what predicts retention
- Ask users to configure anything before they've experienced value
- Build a checklist with more than 5 steps
- Use a modal that blocks the product UI
- Build it in-house and leave it unchanged because iteration requires engineering
- Track completion rate without also tracking activation downstream
- Send the same checklist to all users regardless of role or plan
- Leave the completion state empty, it's a conversion opportunity
What to Include in a User Onboarding Checklist
The specific tasks in your checklist will depend on your product and your activation event. But there is a set of structural elements that appears in almost every high-performing checklist, regardless of product category.
-
A welcoming entry point
The first moment a user sees the checklist sets the tone for the entire onboarding experience. A short, friendly welcome message, "You're 5 steps away from your first win," is more motivating than a neutral task list with no context. Name the destination, not just the journey.
-
A "quick win" as step one
The first task should be completable in under 90 seconds and should deliver immediate, visible value. A quick win in step one dramatically increases the likelihood of completing the full checklist. If step one requires leaving the product to gather information, drop-off will spike before anyone reaches the steps that actually matter.
-
The core activation action
This is the single most important step: the one that, when completed, predicts retention with the highest confidence. In a project management tool, it might be "Create your first project." In a collaboration tool, "Invite a teammate." In an analytics product, "Connect your first data source." This step gets the most prominent placement, the clearest copy, and the most contextual support.
-
A social or collaborative step (if relevant)
For products where value increases with multiple users, an "invite a teammate" step belongs early in the checklist, not at the end. A user who has invited someone else has a built-in reason to return. That external accountability dramatically improves second-session rates.
-
A path to deeper help
The last item is the right place to surface your knowledge base, help center, or an invitation to a live onboarding session. Users who have activated are in the right mindset to explore further, users who have not yet activated are not ready to absorb advanced documentation. Sequence your support resources to match where users are in their journey.
-
A clear completion state
What happens when a user finishes the checklist? If the answer is "nothing" and the widget just disappears, you are missing a conversion opportunity. A completion screen that acknowledges the milestone, reveals a next-level challenge, or promotes an upgrade is a high-leverage moment that most teams overlook entirely.
For complex products, a multi-checklist groups several shorter flows so users always know what comes next.
Real-World Examples of Onboarding Checklists That Work
The best way to understand what a high-performing checklist looks like is to see how successful products handle it. Here are three patterns worth studying.
Notion takes a uniquely self-referential approach to onboarding: instead of overlaying a traditional checklist widget, they use their own product as the onboarding experience. Every new workspace opens with a "Getting Started" page, a real Notion page, that doubles as an interactive checklist. The items walk users through core interactions: clicking anywhere to type, using the / command to insert content blocks, highlighting text to style it, dragging blocks to rearrange them, creating a new page from the sidebar, and browsing templates.
What makes it brilliant is that completing the checklist is using the product. There is no separation between "learning Notion" and "using Notion." The first checked item ("Click anywhere and just start typing") is already done by the time users read it, giving them an instant sense of progress. A toggle block at the end hides deeper resources, the template gallery, help center, and video guides, so advanced content is available but never overwhelming. A small ? button in the corner offers a persistent escape hatch to support.
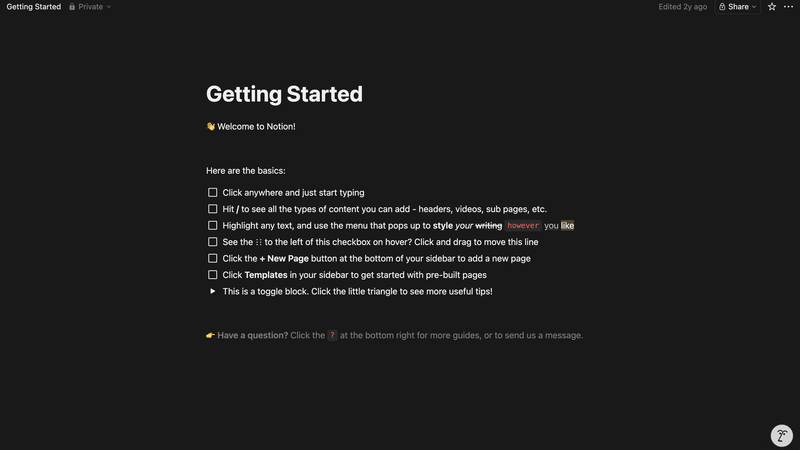
Notion's Getting Started page, onboarding built entirely inside the product itself.
Stripe's onboarding checklist is built around a core insight: users can only go live once they trust the platform and have completed the necessary compliance steps. Rather than overwhelming new users with every configuration option at once, Stripe separates the experience into two phases, a sandbox for safe testing, and a guided "Finish your setup" checklist that surfaces only after users have explored the product.
The setup checklist is short and focused: verify your email, verify your business, create your Stripe profile. Each step is clearly labeled with its completion state, and a visible progress bar communicates how close the user is to going live.
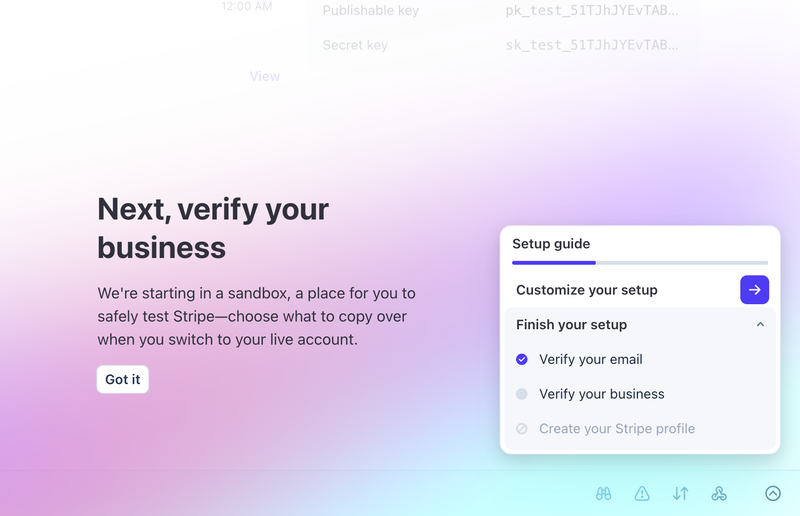
Stripe's setup guide, short, trust-focused, and completion-driven.
Lemlist's onboarding checklist is built around a single goal: get new users to launch their first outreach campaign. The checklist surfaces immediately on the home dashboard and walks users through five steps: create your first campaign, import leads, connect your sending email, find leads on LinkedIn, and launch. Each step is linked to an action button and a supporting lesson, so users never have to leave the checklist to figure out what to do next.
A progress bar shows "1 of 6 tasks completed" from the very first session, and optional steps like the LinkedIn Chrome extension are labelled as such, so users who are not ready for advanced features are never blocked from moving forward.
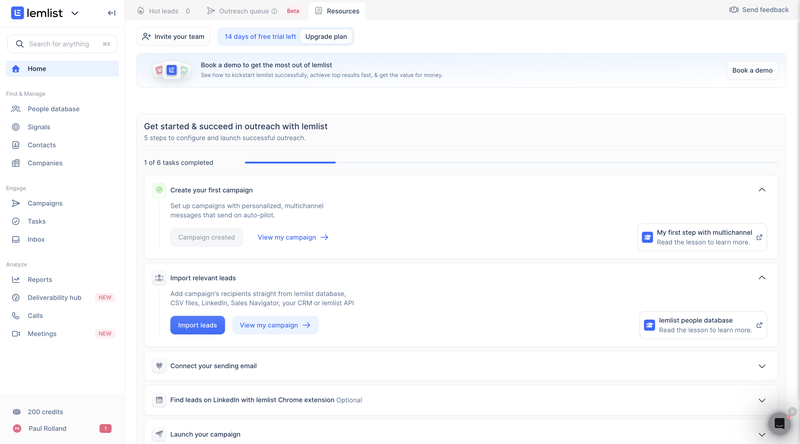
Lemlist's onboarding home, a step-by-step checklist driving users to their first campaign launch.
How to Measure Whether Your Checklist Is Working
The most important rule in onboarding measurement: track activation downstream of completion, not just completion itself. A checklist that achieves 78% completion with a flat activation rate is not working, it is measuring the wrong behavior.
| Metric | What it tells you | What to do if it is low |
|---|---|---|
| Checklist completion rate | Share of new users who complete all tasks | Reduce the number of steps; improve placement; rewrite task copy |
| Step-level drop-off rate | Where in the checklist users abandon the flow | Add contextual support at that step; simplify the task; consider removing it |
| Activation rate | Share of new users who reach your activation event | Validate that your checklist items correlate with activation; resequence if needed |
| Time to first key action | How long it takes users to reach the activation milestone | Put the activation action earlier in the checklist; add more support at earlier steps |
| 30-day retention by checklist completion | Whether completers retain better than non-completers | If the gap is small, your checklist tasks do not predict retention, go back to step 1 |
| Checklist dismissal rate | How many users close the checklist without starting it | Review placement; A/B test the entry moment; test different welcome copy |
Track these metrics from the moment you launch. The step-level drop-off data will tell you which item to fix first. The 30-day retention comparison will tell you whether fixing individual steps is moving the outcome that actually matters, users staying active after the first month.
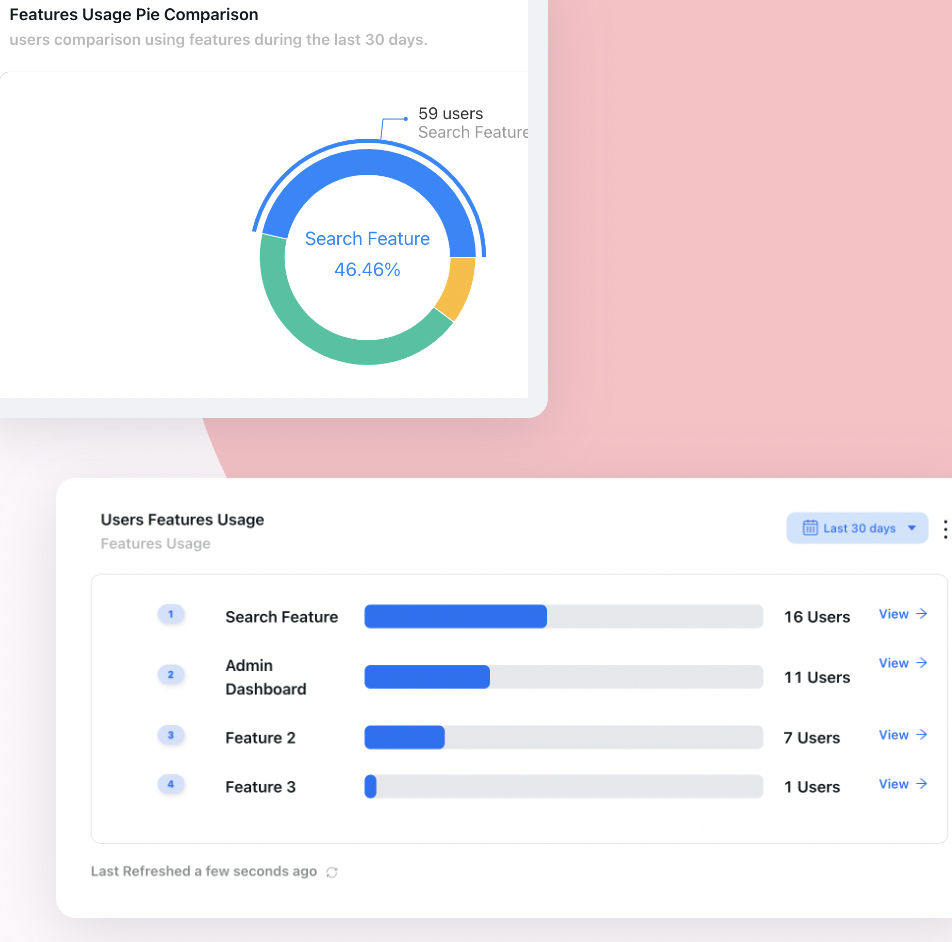
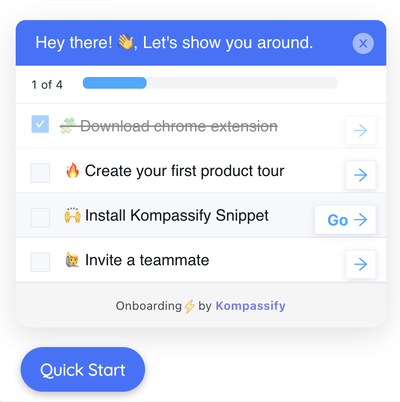
Feature-level usage data reveals which checklist tasks drive activation, and which ones are just noise.
Building Without Code: The Case for a No-Code Checklist Tool
The fastest path from "we need a better checklist" to "our activation rate is up 20%" is not engineering bandwidth, it is iteration speed. A checklist built in-house requires engineering involvement every time you want to change a task, reorder a step, or test different copy. That means most teams ship one version and leave it, even when the data is telling them exactly what to fix.
A no-code tool like Kompassify changes that entirely. Your product or growth team can build the checklist, set targeting rules for different segments, connect each step to analytics tracking, and A/B test variants, all without touching the codebase. When drop-off data tells you step three is losing users, you can rewrite the copy and push the change the same day.
Kompassify's no-code checklist builder: segment users, set triggers, and track completion without engineering.
The hidden cost of slow iteration: If your activation problem reveals itself in week-two cohort data but your fix takes a quarter to ship through engineering, you have lost twelve weeks of new signups to a friction point you already identified. No-code tools close that gap. The compounding effect of shipping fixes weekly rather than quarterly is significant over a twelve-month period.
Frequently Asked Questions
What is a user onboarding checklist?
A user onboarding checklist is a short, structured list of 3–5 tasks that guide new users from sign-up to their first meaningful outcome inside your product. Each item represents a step toward activation, the moment a user experiences your product's core value for the first time. As tasks are completed, they are checked off one by one, creating a sense of progress and momentum that keeps users moving forward through the setup flow.
How many steps should an onboarding checklist have?
Research consistently points to 3–5 items as the optimal range. Every step beyond five adds measurable drop-off before users reach their activation milestone. If your product genuinely requires more setup before a user can get value, split the flow: a short "quick start" checklist that achieves initial activation, followed by a secondary "advanced setup" list that surfaces only after users have completed the first one.
What is the difference between an onboarding checklist and a product tour?
A product tour is a passive orientation experience: it shows users around the product and communicates value. A checklist is an action-oriented structure that tells users what to do and tracks their progress toward activation. The two formats are complementary: the tour provides context and builds motivation, then hands the user a checklist that drives them through the specific actions that define activation. Used together, they are the most complete new-user onboarding pattern available.
When should an onboarding checklist appear?
The most effective trigger is immediately after a new user completes sign-up and lands on their dashboard for the first time. If you run a short product tour first, show the checklist the moment the tour ends. Behavioral triggers consistently outperform time-based ones: showing the checklist when a user reaches a specific page is more effective than showing it after an arbitrary time delay.
What metrics should I track for my onboarding checklist?
The most important metrics are: checklist completion rate (share of new users who complete all tasks), activation rate (share who reach your defined activation milestone), step-level drop-off rate (where users abandon the flow), time to first key action, and 30-day retention segmented by checklist completers versus non-completers. Always track activation downstream of completion: a 78% completion rate with a flat activation rate means your checklist is driving the wrong behavior, not that your onboarding is working.
Should I build an onboarding checklist myself or use a tool?
Building in-house is possible but expensive in developer time and nearly impossible to iterate on quickly. Every copy change, task reorder, or new segment variant requires engineering involvement, which means most in-house checklists are built once and left unchanged even when the data clearly shows what needs to improve. A no-code tool like Kompassify lets your product or growth team create, launch, segment, and A/B test checklists without touching the codebase. The speed of iteration that approach enables is typically the single most important factor in reaching a checklist that actually moves your activation numbers.